Contacts
JUREK S+R s.r.o.
č. p. 766
73913 Kunčice pod Ondřejníkem
phone: +420 556 850 032
fax: +420 595 175 026
radim(a)jurek.cz
JUREK shop in Kunčice pod Ondřejníkem 766
Tues. 7-17 Wed. - Fri 7-15
č. p. 766
73913 Kunčice pod Ondřejníkem
phone: +420 556 850 032
fax: +420 595 175 026
radim(a)jurek.cz
JUREK shop in Kunčice pod Ondřejníkem 766
Tues. 7-17 Wed. - Fri 7-15
Goods in action

Best sellers


TRIP building instructions
TRIP single entrance tent building instructions
- Unfold the tent (the inner tent is suspended on flysheet) with the floor to the ground (you can pin it with four pegs to the ground to facilitate the construction in windy weather).
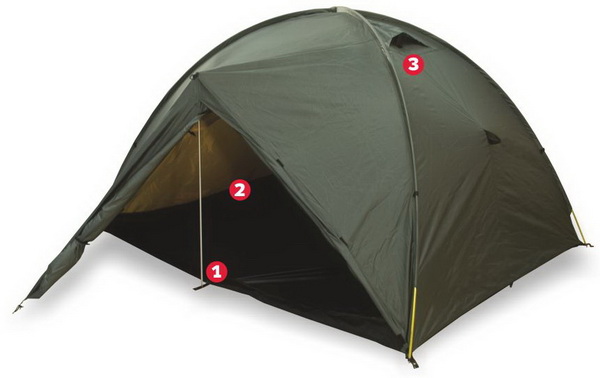
- Unfold the duralumin poles (check that the individual segments have snapped into the couplings) and push them through sleeves into the inner eyelets at oppsite corners of the floor.
- Triangles on the elastics at the corners of the flysheet can be attached by pulling the protruding ends of the poles.
- Insert the folded duralumin pole with the wider end into the snap button at the top of the vestibule and prop on the ground through the inner eyelet in the ear sewn on the floor.
- Tighten the flysheet and vestibule at the bottom edge, either by the triangles (rings) so that the flysheet edges are adjamcet to the ground (in cold weather), or by using short lines to pull the bottom flysheet to increase air intake (hot and humid days).
- Tighten the longer walls of the flysheet using pegs (or larger stones) and longer a guylines at the center sides.
- Use pegs pins in the handles of the floor to anchor the flyshhet. Use long guylines wich are caught by the edge handles if neccesary. It will also stabilizes the construction (in this case it is neccesary that the Velcro on the inside under the handle is attached to the construction.
The tent can also be built separately.
- The inner tent has sewn sutures for individual hanging behind the poles of the structure.
- To build the tropics you need a supplement no.1 which you can buy.

TRIP DUO double entrance tent building instructions
- Unfold the tent (the inner tent is suspended on flysheet) with the floor to the ground (you can pin it with four pegs to the ground to facilitate the construction in windy weather).
- Unfold the duralumin poles (check that the individual segments have snapped into the couplings) and push them through sleeves into the inner eyelets at oppsite corners of the floor.
- Triangles on the elastics at the corners of the flysheet can be attached by pulling the protruding ends of the poles.
- Insert the folded duralumin pole with the wider end into the snap button at the top of the vestibule and prop on the ground through the inner eyelet in the ear sewn on the floor.
- Tighten the flysheet and vestibule at the bottom edge, either by the triangles (rings) so that the flysheet edges are adjamcet to the ground (in cold weather), or by using short lines to pull the bottom flysheet to increase air intake (hot and humid days).
- Tighten the longer walls of the flysheet using pegs (or larger stones) and longer a guylines at the center sides.
- Use pegs pins in the handles of the floor to anchor the flyshhet. Use long guylines wich are caught by the edge handles if neccesary. It will also stabilizes the construction (in this case it is neccesary that the Velcro on the inside under the handle is attached to the construction.
The tent can also be built separately.
- The inner tent has sewn sutures for individual hanging behind the poles of the structure.
- To build the tropics you need a supplement no.2 which you can buy.