Contacts
JUREK S+R s.r.o.
č. p. 766
73913 Kunčice pod Ondřejníkem
phone: +420 556 850 032
fax: +420 595 175 026
radim(a)jurek.cz
JUREK shop in Kunčice pod Ondřejníkem 766
Tues. 7-17 Wed. - Fri 7-15
č. p. 766
73913 Kunčice pod Ondřejníkem
phone: +420 556 850 032
fax: +420 595 175 026
radim(a)jurek.cz
JUREK shop in Kunčice pod Ondřejníkem 766
Tues. 7-17 Wed. - Fri 7-15
Goods in action

Best sellers


DOME tents building instructions
models Dome 2.0 / Dome 2 KM / Dome 2 P / Dome 3 / Kombat 2 AP
The DOME tents can also be built separately, both in the tropics and in the inner tent. The inner tent is built in the same way, only the tropic is not added. To build the tropics you need to use the add-on No.1 and the add-on No.2 together, which you can buy.
DOME 2 Building instructions:
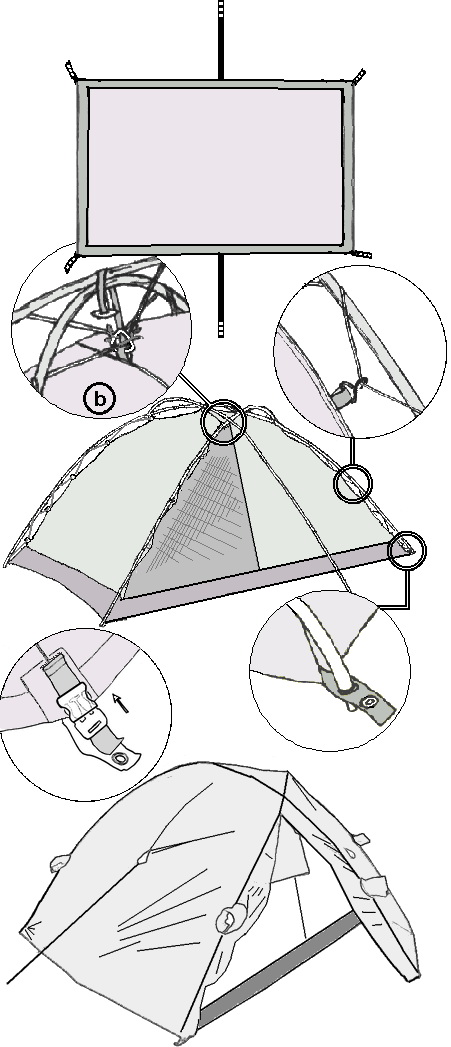
- Unfold the inner tent with the floor to the ground (you can pin it with six pegs to the ground to facilitate the construction in windy weather).
- Gradually insert the three composite duralumin poles (check that the individual segments have snapped into the couplings) into the inner eyelets of the ears (always the ends of one pole at opposite corners of the floor) to form three crosses.
- Pull the tensioning cords (top, then side) over the aluminum bars and grab the hooks.
- Swing the flysheet over the structure and align the reflective marked corner of inner tent with reflective marked corner on flysheet. Snap plastic clips around the perimeter of the tent into the counterparts on the ears of the inner tent. Tighten the straps.
- Tighten the two rear side walls and the flysheet entrance wall using long guylines (grabbing them by the handles in the middle of the walls) and pegs (or larger stones).
- Use three pegs to tighten the walls at the bottom edge. Either behind the triangles so that the edge of the flysheet is close to the ground (in cold weather), or with short guylines, pull the bottom edge of the flysheet to increase air intake (on hot and humid days).
- Use the pegs that are pins in the floor eyelets, along with the remaining long guylines, to anchor the tent behind the poles of the structure through the sleeves on the flysheet (especially proven in extreme winds).
.jpg)
DOME 2 KM Building instructions:
- Unfold the inner tent with the floor to the ground (you can pin it with six pegs to the ground to facilitate the construction in windy weather).
- Gradually insert the three composite duralumin poles (check that the individual segments have snapped into the couplings) into the inner eyelets of the ears (always the ends of one pole at opposite corners of the floor) to form three crosses.
- Pull the tensioning cords (top, then side) over the aluminum bars and grab the hooks.
- Swing the flysheet over the structure and align the reflective marked corner of inner tent with reflective marked corner on flysheet. Snap plastic clips around the perimeter of the tent into the counterparts on the ears of the inner tent. Tighten the straps.
- Tighten the two rear side walls and the flysheet entrance wall using long guylines (grabbing them by the handles in the middle of the walls) and pegs (or larger stones).
- Use three pegs to tighten the walls at the bottom edge. Either behind the triangles so that the edge of the flysheet is close to the ground (in cold weather), or with short guylines, pull the bottom edge of the flysheet to increase air intake (on hot and humid days).
- Use the pegs that are pins in the floor eyelets, along with the remaining long guylines, to anchor the tent behind the poles of the structure through the sleeves on the flysheet (especially proven in extreme winds).
.jpg)
DOME 2 P building instructions:
- Unfold the inner tent with the floor to the ground (you can pin it with six pegs to the ground to facilitate the construction in windy weather).
- Gradually insert the three composite duralumin poles (check that the individual segments have snapped into the couplings) into the inner eyelets of the ears (always the ends of one pole at opposite corners of the floor) to form three crosses.
- Pull the tensioning cords (top, then side) over the aluminum bars and grab the hooks.
- Swing the flysheet over the structure and align the reflective marked corner of inner tent with reflective marked corner on flysheet. Snap plastic clips around the perimeter of the tent into the counterparts on the ears of the inner tent. Tighten the straps.
- Tighten the two rear side walls and the flysheet entrance wall using long guylines (grabbing them by the handles in the middle of the walls) and pegs (or larger stones).
- Use three pegs to tighten the walls at the bottom edge. Either behind the triangles so that the edge of the flysheet is close to the ground (in cold weather), or with short guylines, pull the bottom edge of the flysheet to increase air intake (on hot and humid days).
- Use the pegs that are pins in the floor eyelets, along with the remaining long guylines, to anchor the tent behind the poles of the structure through the sleeves on the flysheet (especially proven in extreme winds).